Joining mechanical joints (MJ) on ductile iron pipe requires proper alignment, gasket seating, and bolt tightening to ensure a leak-proof, durable connection. This AWWA C111-compliant method involves assembling the gland, rubber gasket, and pipe spigot, then applying progressive bolt torque in a crisscross pattern.
1. Introduction to Mechanical Joints in Ductile Iron Pipes
Joining mechanical joints in ductile iron pipes is a critical step in ensuring the integrity and longevity of a piping system. Mechanical joints provide a secure, reliable, and leak-proof connection, offering flexibility and ease of installation in both new and existing systems. These joints are used in a wide range of applications, including water distribution systems, sewage systems, and industrial piping networks.
Mechanical joints in ductile iron pipes are often chosen because they offer distinct advantages over other types of joints, such as welded or glued connections. They allow for easier assembly and disassembly, which is essential for repairs and maintenance. This flexibility is one of the primary reasons for their widespread use in municipal and industrial projects.
2. Understanding Ductile Iron and Its Properties
What is Ductile Iron?
Ductile iron, also known as nodular cast iron, is a type of iron alloy characterized by its high strength, flexibility, and resistance to corrosion. The material’s unique properties make it an ideal choice for the construction of durable and long-lasting pipes.
Benefits of Ductile Iron Pipes
-
High Strength and Durability: Ductile iron pipes can withstand high pressures, making them suitable for water distribution and industrial applications.
-
Corrosion Resistance: Ductile iron has superior resistance to rust and corrosion compared to traditional cast iron, extending the lifespan of piping systems.
-
Flexibility: The material’s flexibility allows it to handle ground movements without cracking, a crucial factor in areas with seismic activity.
Challenges with Ductile Iron Pipes
Despite their many benefits, ductile iron pipes can present challenges during installation, such as the need for precise alignment and proper joining techniques to ensure leak-proof connections.
3. Types of Mechanical Joints for Ductile Iron Pipes
There are several types of mechanical joints used to connect ductile iron pipes, each with its own set of advantages and applications:
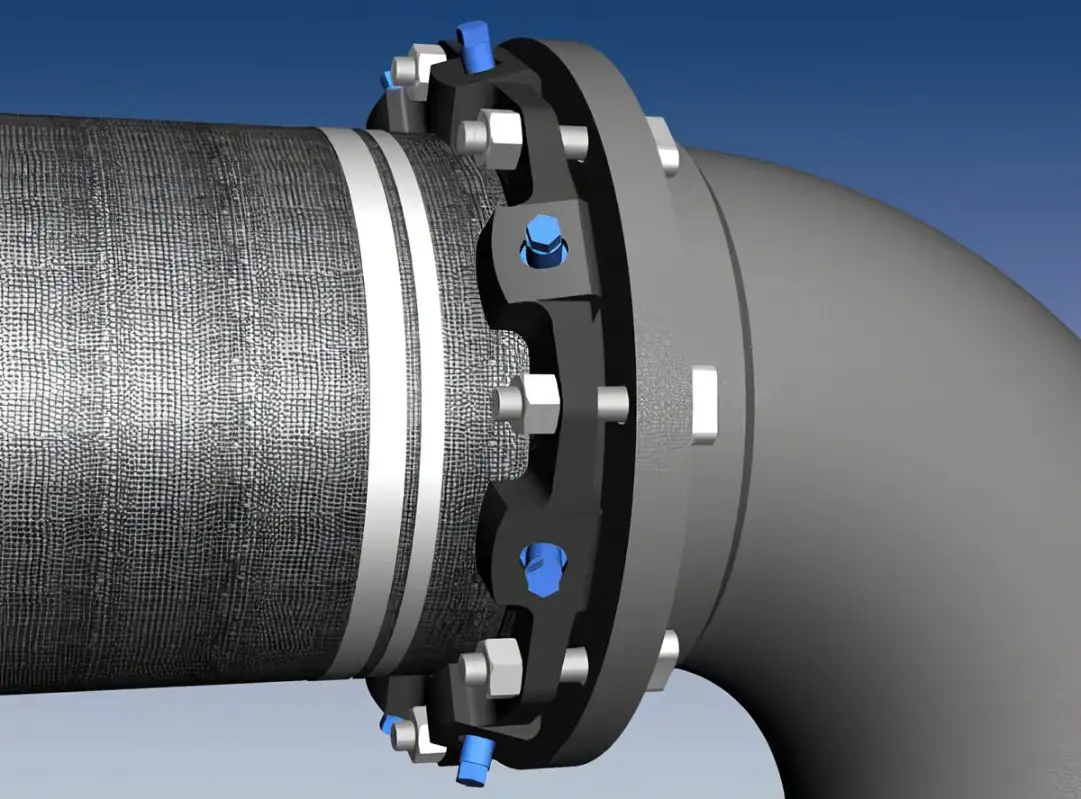
3.1 Flanged Joints
Flanged joints are among the most common types of mechanical joints. They feature a flange that is bolted to another flange, creating a strong and reliable connection. This type of joint is often used in situations where disassembly may be required for maintenance.
3.2 Push-on Joints
Push-on joints are designed for quick, efficient installation. They are typically used for underground piping systems where it is difficult to access the joint after installation.
3.3 Grooved Joints
Grooved joints use a grooved pipe end and a coupler to create a strong, pressure-resistant seal. These joints are often used in fire protection systems and in applications where flexibility is needed for future modifications.
3.4 Threaded Joints
Threaded joints feature a threaded connection between the pipe and the fitting. This method is often used for smaller pipes or in areas where space constraints require compact installations.
4. Tools and Materials Required for Joining Mechanical Joints
4.1 Tools
-
Wrenches and Torque Wrenches: Used to tighten bolts to the correct torque specification.
-
Pipe Cutter: For cutting ductile iron pipes to the correct length.
-
Deburring Tool: To remove rough edges after cutting the pipe.
-
Measuring Tape: For accurate measurement of pipe lengths and joint alignment.
-
Alignment Tools: To ensure proper positioning of the joint during installation.
4.2 Materials
-
Mechanical Joints (Flanges, Couplers, or Fittings): The primary component for creating the connection.
-
Gaskets: Ensures a leak-proof seal between the joint components.
-
Bolts and Nuts: Used to secure the joint in place.
5. Step-by-Step Guide: How to Join Mechanical Joints in Ductile Iron Pipes
5.1. Preparation
-
Shut Off the System: Ensure that there is no pressure in the system before starting the installation.
-
Inspect the Pipe: Check the ductile iron pipe for any cracks or damages.
-
Clean the Pipe Ends: Deburr the ends of the pipe and clean them thoroughly to ensure a smooth joint connection.
5.2. Positioning the Joint
Align the mechanical joint with the pipe, ensuring the gasket and flange are correctly positioned.
5.3. Tightening the Bolts
Using the correct torque specification, tighten the bolts gradually and evenly to ensure the joint is properly secured.
5.4. Testing for Leaks
Once the joint is secured, perform a pressure test to check for any leaks around the joint area.
6. Troubleshooting Common Issues with Mechanical Joints
6.1. Misalignment
If the joint is misaligned, it can lead to leaks or stress on the pipe. To resolve this, use alignment tools to properly position the joint before tightening the bolts.
6.2. Leaks
Leaks can occur if the gasket is not seated properly or if the bolts are not tightened to the correct torque. Check the gasket for damage and ensure the bolts are tightened evenly.
7. Best Practices for Maintaining Mechanical Joints
7.1. Regular Inspection
Inspect mechanical joints periodically to ensure they remain secure and leak-free.
7.2. Re-tightening Bolts
After a period of use, the bolts may loosen. Re-tighten them to the manufacturer’s recommended torque specifications to maintain a strong, leak-proof connection.
8. Advantages of Using Mechanical Joints
Compared to other joining methods, mechanical joints offer numerous advantages, including:
-
Ease of Installation and Disassembly
-
Flexibility for Future Modifications
-
Leak-Free and Pressure-Resistant Connections
9. Frequently Asked Questions (FAQs)
Q1: What tools are necessary for installing mechanical joints on ductile iron pipes?
The necessary tools for installing mechanical joints on ductile iron pipes include wrenches (adjustable and torque), pipe cutters, deburring tools, measuring tapes, and alignment tools. These tools ensure that the joint is securely and properly installed, with no leaks.
Q2: Can mechanical joints be used for high-pressure applications?
Yes, mechanical joints can be used for high-pressure applications as long as the correct materials and torque settings are used. The joint design must be suitable for the pressure requirements of the system.
Q3: How do I prevent leaks in a mechanical joint connection?
To prevent leaks, ensure that the gasket is installed properly, and the bolts are tightened according to the recommended torque specifications. Regularly inspect the joints for wear or damage.
Q4: What is the ideal torque for tightening mechanical joints on ductile iron pipes?
The ideal torque for tightening mechanical joints on ductile iron pipes depends on the joint type and pipe size. Always refer to the manufacturer’s specifications for the recommended torque values.
Q5: What should I do if the pipe is misaligned during the installation of a mechanical joint?
If the pipe is misaligned, use alignment tools to adjust the position of the pipe and joint before tightening the bolts. Misalignment can lead to leaks or joint failure.
Q6: How often should mechanical joints be inspected and maintained?
Mechanical joints should be inspected at regular intervals, ideally every 6-12 months, depending on the system’s usage. Periodic checks ensure that the joints remain secure and leak-free.
Conclusion
Joining mechanical joints in ductile iron pipes is an essential skill for ensuring the integrity of your piping systems. By following the guidelines and best practices outlined in this article, you can achieve a secure, leak-free connection that will perform reliably for years to come.
References:
AWWA C111 – American Water Works Association Standard for Mechanical Joint Fittings
Wikipedia – Ductile Iron Pipe: Properties, Applications, and Jointing Methods
ASTM C151 – Standard Specification for Ductile Iron Pipe Fittings
U.S. Nuclear Regulatory Commission – Guidelines for Bolted Mechanical Joints
McWane Ductile – How to Install a Mechanical Joint Fitting on Ductile Iron Pipe
